Quickstart
Welcome to Toony Standard RE:Build! Here we have a very quick rundown of the main features and quirks of the shader.
If you haven't done it yet, go and grab the latest version.
The main quirk about this shader is that it is based on the Modular Shader System, giving you the possibility to add first or third party modules to add functionality to the shader.
For that very reason, by default the shader only has a limited amount of features available by default, since most of the features are going to be served via modules.
The Shader Inspector
Apply the shader to a material by selecting VRLabs/Toony Standard RE:Build and give a look at the default inspector:
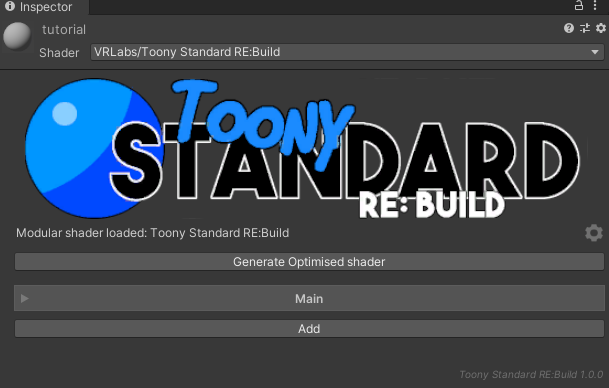
After the banner you can see a line showing the selected modular shader, the language selection, and a gear icon that let's you go to the options for the shader, we'll check this one later on.
Note
There are 2 reasons to why the modular shader used is showed: a modular shader can contain multiple generated shaders and the inspector can handle different shaders
After that you can see a button to generate an optimized shader for this material. This can be used to create a version of the shader optimized for the currently selected features, which, depending on the amount of the modules currently added in the shader, can generate a way more performant shader, since even modules that have been added to the shader do get optimized out if they're not actively used.
Also due to this nature whenever the material is in an optimized state, you won't be able to change settings, but you can always revert the process to go back to the full shader.
Now, to the main part, shader options.
By default there is only 1 section visible, called Main.
This tab contains some basic option, like culling and blend mode, as well as a couple of general textures that are going to be used around the shader.

The Albedo and Normal map are very common textures that you probably already know from pretty much every shader seen before (yes, even standard).
The MSSO map on the other hand is a map specific to Toony Standard RE:Build. It is a custom packed map, with each texture channel being its own mask.
The masks are as follows:
- Red Channel: metallic mask.
- Green Channel: smoothness mask.
- Blue Channel: specular mask.
- Alpha Channel: occlusion mask.
We talk a bit more about these masks in this page.
After that there's just an occlusion slider, that is used to define how much of the occlusion effect from the mask is used (when the mask is empty or white, it does nothing).
At the end we find an Add button. This button is where you will select features to enable for the shader, both from the default feature set and extra active modules (some modules can add options directly into the Main section, but is usually good practice to have dedicated sections for specific features).
By pressing the button a popup really similar to the shader selector appears, but it lists available shader features instead, you can explore to see what's available, or search and select something specific.
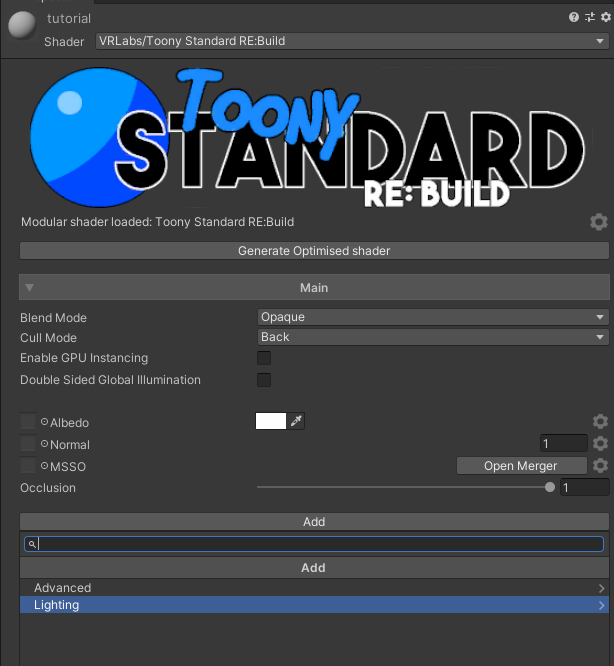
By default there are only 3 section: Toon Lighting, Specular and Stencil Options.
Once you select one, the section appears in the inspector with its options.
You can play around with them and test them out, we have a dedicated page for each section of the shader.
If you want to remove a section, just click the X button on the section header, and if you want to reorder around the list of sections you can use the arrows on the side. The sections order is kept per material, so go have fun with it.
Ok, now let's get to the fun part and let's add some more features by downloading and activating more modules. In this page we keep a collection of links to all our first party free modules for the shader, as well as some free third party ones that we liked or at least tried and verified that work. Go and download what you like.
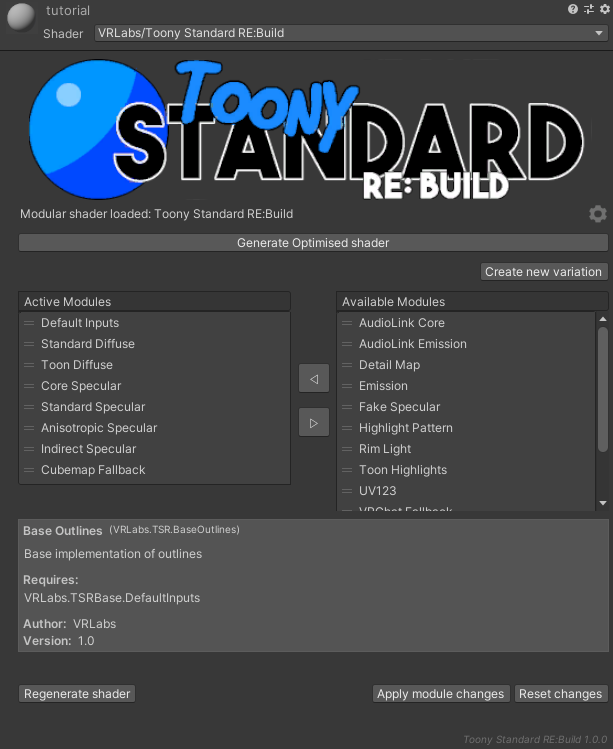
After downloading and installing the packages, get back to the material, and click the gear icon we mentioned before. This opens the settings part of the inspector, where you can add and remove modules from the active list.
Warning
For the most part, unless one of your downloaded modules clearly specifies otherwise, we suggest to not remove the modules active by default, since those ones are fairly basic ones that give the basic lighting system for the shader. Technically the shader would still work without most of them, since the core modules needed are not listed and not removable, but it would not be too much usable from an user standpoint unless a similarly scoped module takes its place.
For example if you remove the Default Inputs module, you won't have a way to set a material color, unless you install another module that takes the place in providing an Albedo to the shader, like a module designed for giving RGBA masked Albedo color instead of the default single texture.
Now, add the modules you want by selecting them from the Available Modules and selecting the button with the arrow pointed towards the Active Modules list.
This will move the module from the Available Modules to the Active Modules.
Tip
Whenever you select a module from either lists, some info about the module will pop up. These infos will tell you the name of the shader, a description of what it does, which modules are incompatible with it, and which modules are required in order for this module to run.
Warning
The inspector will notify you if there are missing required modules or modules incompatible with each other in the active tab. Whenever there are these issues you won't be able to save changes until you fix them.
Once you're happy, you can click the Apply module changes button to apply the new modules. This will cause the shader to recompile with the new features, which may or may not take time depending on the amount of modules installed.
After that's done, you can click the gear icon again to switch out of the settings back to the material options.
Note
Module changes will not be saved if you get out of the settings without applying the module changes.
Now you can go and enjoy the new features added to the shader!
Remember that if you update the module package to get new updates of said module, you will have to go and click the Regenerate shader button from the settings of a material.
Note
Usually when a module is updated with new properties to play with you will notice the need immediately cause the inspector will spit out some error notices, but other times it may look fine even if the shader hasn't been regenerated. So it's good measure to always regenerate the shader whenever you update a module.
Now you're up to speed with what you need to know to use the shader and have fun with it! There are still a lot more features and things to talk about, but they're not needed for a basic use of the shader.
If you want to get more detailed info about a topic, check the other guides on this site, and if you think there's something missing in the guides, come on Discord and notify us about it, if it's something that we agree it should be in here we will gladly take it into consideration.